Setup a local DNS Server
Created: Tue 15 Aug 2023 Updated: 7 months, 3 weeks ago

In this article, you'll learn about how you can create and configure a DNS server in your local network. This local DNS server will be used for local domain name resolution.
Prerequisite
For this article, I'll be using dnsmasq, a lightweight, easy to configure, DNS forwarder, and DHCP server. I'll be using virtual machines for the server but you can use an actual system if you want. Just make sure the server and client are connected to the same network.
This article is focused on Linux only. I'm using Ubuntu 22.04 LTS but the same method will work on all other distributions with a little bit of changes.Why local DNS ?
Nowadays we have multiple services running on the network. Whether It's an organization or home, a local DNS server can be very helpful in both scenarios. I'll be talking in the context of the home scenario but the same method can be applied on the organizational level.
Now if your home network is like mine where I'm running two webservers, one file-sharing server, and one chatting server. All services are running on the home network and can only be used locally. Each service can be accessed using a specific IP address. To access these services using a domain name instead of IP address, we should use a local DNS server. It's easy to remember a domain name instead of 32-bit IP address.
DNS Server configuration
I'll be using a virtual machine as DNS server for this purpose but you can use any spare system you want. If you decided to follow along using a virtual machine, make sure It's connected to the network using Bridge mode instead of NAT mode.
In the server-side configuration, we'll start by installing dnsmasq first. Run the below command to install:
sudo apt install dnsmasq
After successful installation, we need to disable and stop systemd-resolved service. Systemd-resolved acts as a local DNS resolver and maintains cache of DNS responses on Linux systems. Use the below commands to disable and stop the mentioned service:
sudo systemctl disable --now systemd-resolved.service
Since we'll be using dnsmasq as local DNS resolver, systemd-resolved must be stopped because both services listen to port 53 and two services cannot utilize the same port at the same time. We cannot use dnsmasq on a different port because most applications use port 53 as their default port for name resolution. That's why we have to disable systemd-resolved service.
Now open the dnsmasq configuration file at /etc/dnsmasq.conf and add these lines:
port=53
no-resolv
address=/my.home.server/192.168.1.19
address=/home.filesharing.server/192.168.1.21
address=/home.chat.server/192.168.1.24
server=8.8.8.8
- port=53 is used to specify the port that will be utilized by dnsmasq
- no-resolv is used for preventing the DNS server from using the '/etc/resolv.conf' file to acquire nameservers. Instead, DNS nameservers will be provided from the'/etc/dnsmasq.conf' file.
- address=/my.home.server/192.168.1.19 is used for mapping the domain names with local IP addresses. Here I'm using 'my.home.server' as my local domain name and '192.168.1.19' is the IP address of my local webserver. You can define multiple services by mapping their IP addresses with domain names of your preference.
- server=8.8.8.8 is used to redirect
any public DNS requests. All other (non-local) requests will be redirected to this
nameserver. Here I'm using Google's nameserver but you can use others like
1.1.1.1which is Cloudflare's nameserver or9.9.9.9for Quad9's nameserver
Now save and close the file. Use the below command to enable and start dnsmasq service:
sudo systemctl enable --now dnsmasq
With this being done, dnsmasq.service should be enabled and running. The DNS server is configured and ready to take requests for name resolution.
Client-side configuration
After configuring the DNS server, you need to make some changes in your client machine to use
and utilize the local DNS server. Open /etc/systemd/resolved.conf file and add these lines:
DNS=192.168.1.20
DNSStubListener=no
- DNS=192.168.1.20 is specifying which server should be used as local DNS. Here I'm writing my local DNS server IP address, you must enter the IP address of your local DNS server that we configured in the previous part.
- DNSStubListener=no is used to forward all DNS queries to the specified DNS server. By default, all DNS queries are resolved by systemd-resolved but with this option as 'no', all DNS queries will be forwarded to 192.168.1.16 or the IP address of your local DNS server.
Save and close the file. Now use the below command to restart systemd-resolved service:
sudo systemctl restart systemd-resolved.service
This command will flush all previous DNS records and activate the new DNS server. Now It's time to test whether the newly configured local DNS server is working and resolving DNS queries or not.
Testing DNS queries
- Use
ping my.home.server -c 5command to ping local server using It's mapped domain name. If everything works the way It's expected, the output should be something like this: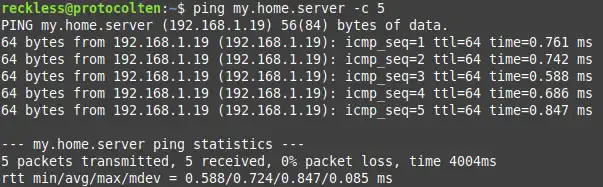
- Use
ping google.com -c 5command to ping google.com for the purpose of public DNS queries. If your server handing non-local domain resolution queries as expected, the output should be something like this: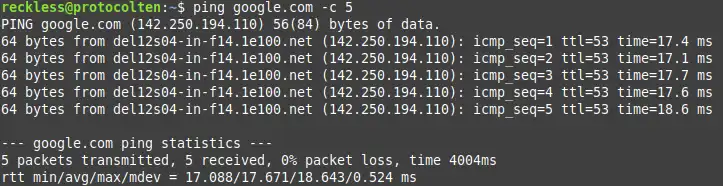
- Use
nslookup my.home.servercommand to check which server is handling the DNS queries. The output should be something like this: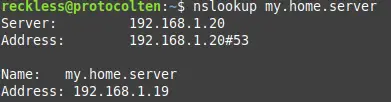
Here you can notice my.home.server has been resolved into 192.168.1.19 by using the DNS 192.168.1.20, which is our local DNS server, using port 53.
This is a simple configuration of a local DNS server where we didn't explore much. But dnsmasq offers many useful features that we can use. Read the documentation for more advanced configuration.